Wednesday, 4 May 2011
Supporting Magazine Article

You can see a PDF version of this document at the link below.
http://public.iwork.com/document/?d=MEDIA_ANCILLARY_PIECE.pages&a=p1048528609


Tuesday, 22 March 2011
Volswagen Commercials
The other day I saw a Louis Theroux documentary advertised on television which reminded me that I hadn't done any research into documentarists in a while. Unfortunately, as the advert i saw was on a program i had recorded i actually missed it but when 'googling' some documentarists i studied at the start of my course, i found out this...
In 1999 Nick Broomfield did a series of 5 television adverts for Volkswagen in his unusual style of documentation whilst holding the sound boom with him. They are designed to be amusing and light hearted and as if Broomfield is trying to find out imformation.
http://projector.tv/MediaPage.aspx?MediaID=84413 - Nick Broomfield visits a technology lab in Kyoto where one man is designing a new CD eject mechanism
http://projector.tv/MediaPage.aspx?MediaID=84412 - Nick Broomfield goes to a military testing site to check out their ejector seat technology
http://projector.tv/MediaPage.aspx?MediaID=84330 - This time, Nick Broomfield is on a mission to find out about the chemicals one can find in the dead sea
http://projector.tv/MediaPage.aspx?MediaID=84329 - Nick Broomfield tries to find out some alternative uses for the bulletproof glass used to protect the president of the Unites States
http://projector.tv/MediaPage.aspx?MediaID=84321 - Nick Broomfield has pursued VW engineers around the world in the search for some top-secret technological breakthroughs. This became the basis for the now famous VW ad campaign ‘German for Detail’.
Thursday, 17 March 2011
Idea for CCTV Footage editing
After thinking for ages about how we could make the ring around the attacker walking into the car park on the CCTV footage i decided to take a video of myself and have a play around with it on iMovie, trying to figure out a way to do it. I did find a way which took quite a long time but now that I know how to do it i will be able to hopefully improve it and then we will have the option of whether or not to use it in our final piece.
Firstly, i took a film on my computer using the built-in camera. I then imported this into iMovie and created a new project. After snipping off the start and end (there were unnecessary seconds either side) I found the part of the video where i wanted the ring to appear and right clicked to bring up a menu. I then selected 'Add Freeze Frame from this menu'.

I then turned the clip to black and white by double-clicking and selecting the 'Black and White' video effect.

I then used a program on my Mac called 'Grab' which is the equivalent of the printscreen button on a Windows PC and 'grabbed' the picture in the top right hand side of the iMovie screen.

I then saved this picture to my desktop and opened a program called Paintbrush which is very similar to Paint on a PC and went to File; Open. And opened the image which i had just 'grabbed'.

I then used the circle tool in Paintbrush to circle myself, the part of the picture i wanted to highlight.


I turned the whole clip into black and white using the same technique as the way i had done it before with the freeze frame. Lastly, I added a title at the start just to introduce it and put some music behind it so its not just silent to listen to (I cut the sound out of the clips by double clicking on the clip and setting audio to 0%)
Before exporting to QuickTime the finished result on iMovie looked like this:

Tuesday, 15 March 2011
Posting from your mobile

Sent from my BlackBerry® wireless device
Tuesday, 8 March 2011
Monday, 7 March 2011
Saturday, 5 March 2011
Editing the Second day of Filming
First of all, we edited the two interviews. On the camera, it looked as though you couldn't see any of Lydia's features in the shot which was what we wanted but when we put it onto the computer today it was actually very obvious and you could see her quite clearly. After playing about with the different settings we got the desired effect (below).

There wasn't any editing that needed to be done to the friends interview except we added the same title (Gradient - Black) and wrote 'Rachel - Victim's Friend'.

We started to edit the footage of the attack but quickly realised that it was far too dark and no amount of editing will make it easy to see. We also realized we hadn't got enough footage or in enough angles so we decided not to edit the footage because we are not going to use it. Instead we are just going to take our mistake and learn from it so that next time we film we can get the shots right. As you can see below there were some shots that were so black no amount of editing could fix it.

Tuesday, 1 March 2011
Second day of Filming
Today we had a few things which we had to film.
1. The victims interview
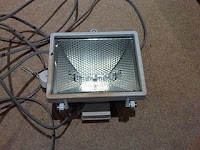
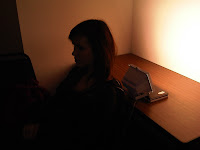 We found an empty office in the ground floor of the common room building which was perfect as there was just a chair and a desk against a white wall. Olivia found a spotlight at her house (I didnt get a photo so this was taken by Olivia) which originally we placed behind Lydia on the desk with the light facing towards the camera but because of the intensity of the light we found that the desired effect could actually be achieved just by having the light directed at the wall with the rest of the lights in the room turned off. We used a tripod to capture the shot. The shot gave the exact look that we wanted and you can only see Lydia's silhouette.
2. The friends interview
For the interview in which I played the friend of the victim, we used the same room but just the other side of it. The shot was taken on a tripod with me at the side of the shot.

3. The attack
We filmed Elliot attacking Lydia on the ground of the carpark in 2 different positions and a from a few different angles. We got a high angle shot of them and some other regular 2-shots. The lighting wasn't very good as it was already getting dark outside and as we were filming behind the skip it was blocking out what little light there was. I did shine a torch from my phone onto the scene as it was being filmed but it did little to help. Hopefully we will be able to fiddle with the effects somehow and make it slightly lighter so that the viewer can see what's going on. Below is a picture of what we filmed to show how dark it is.
Thursday, 3 February 2011
Editing the CCTV footage
Today we edited the CCTV footage which we shot yesterday of Matt and Olivia (the attacker and the victim). After turning the shot black and white and changing the contrast, brightness and saturation a bit to make the shot a bit more fuzzy (to give the effect of a real CCTV camera), we tried to find a good title to use to put in the corner to make the timer in the corner which we found out from our research that so many cameras have.

At first we thought it would be easy because there is a title called 'Date/Time' which obviously displays the date and the time. But unfortunately, it was at the bottom of the screen and we wanted it at the top which we couldn't change. The other problem is that the time only displays hours and minutes and not seconds. We then found the title 'Upper' which is in the top left hand corner like we wanted and allows you to write whatever you want. This was when we realized that we were going to have to split the clip every second and add the title to each separate clip and individually change each one. Liv started off doing this and after about 20 minutes i took over and finished the rest.

It was extremely long-winded and frustrating as one time we realised that we had accidentally missed out a second and had to go back and change every single one. But when we looked at the finished result it was definitely worth it as it looked much more authentic than it would have done if we had just settled for the first title we had seen. We then watched it back and realized that the handle from the window had been in the shot so we had to crop it. We also had to change the font to make it look simpler so Olivia looked through them all and picked 'Synchro LET'. The picture below is of the finished result.
Wednesday, 2 February 2011
Criminal face generator

We thought it would be a good idea to have a sketch of a criminal face shown on our documentary so whilst Olivia and Matt were in the car park (during our first nights filming) sorting out what shots I needed to take I scoured google, trying to find a website that would let you do this online. As i didn't know what the technical name for the sketch was it was quite hard to find but when I typed 'criminal face generator' into google this website came up:
The website allows you to choose from loads of different face shapes, eyes, lips, hair... everything! in order to make your criminal face.
Below is a picture of the finished result...

And here are some pictures of the processs:


The program was easy enough to use all though quite fiddly as you have to arrange all the features separately and size each one but the finished result was good and once I got the hang of it it was quite easy and only took about 10 minutes to create. Hopefully we will be able to show the picture in our documentary and say something along the lines of ''This man is still out there so if you see anybody that fits this image please do not hesitate to contact this number''.
Tuesday, 1 February 2011
First day of Filming
Yesterday we had our first days filming. As our main actors weren't free and we didn't have that much time we decided just to film the CCTV footage using Matt and Liv so that we had something to edit until next week when we will be able to film the rest. Firstly, I set up a tripod out of the window in the common room to get the shot of Matt (the attacker) coming into the carpark. Because the tripod was at a slightly odd angle I had to tilt it slightly out of the window holding it in place between two chairs.
The second shot of Olivia (the victim) walking towards her car was much simpler as the tripod caught the shot perfectly without me having to put it into an awkward position. With both shots I had the lights out because it made the lighting better in the shot.
The second shot of Olivia (the victim) walking towards her car was much simpler as the tripod caught the shot perfectly without me having to put it into an awkward position. With both shots I had the lights out because it made the lighting better in the shot.

Tuesday, 18 January 2011
Equipment

The equipment we will be using this year is the same as last yeah which is good because we are familiar with it and wont have to spend time getting used to it. We will be using an Apple Mac laptop for editing, a sony HDD Handycam for filming and a variety of tripods.
Powered by GoodWidgets.com
Powered by GoodWidgets.com
Monday, 17 January 2011
Types of CCTV

At first, we wanted to use a real CCTV camera to capture the footage but after finding this too difficult we have decided to start researching into different types of CCTV to see how we could make a camera shot on a tripod look like genuine CCTV.
 The first thing we noticed was that the shot would have to be taken from a high angle as most CCTV cameras are rigged high up walls. A second thing we noticed was that many CCTV cameras have a timer in the corner counting up in seconds with a date and sometimes a couple of letters to differentiate if there are lots of cameras e.g. C7, C8, C9...
Another thing we noticed was that the quality wasn't very good on a lot of the footage, which we can easily change once we have the shot by altering the exposure, brightness, contrast and saturation.


 Lastly, we noticed that on many pictures of CCTV footage there are rings around what the viewer is meant to notice just incase they don't notice. We want to do this so we're all going to try and find way to do it because there is not an option to do it on the Mac's we are working on.
 Sunday, 16 January 2011
Permission
We had to get permission to take the cameras and tripods away from school for filming so my mum signed it and we were free to film to our hearts content

Saturday, 15 January 2011
Casting
After planning all our shots and different camera angles we have been able to cut this list down as obviously finding 6 students who are all free at the same time in the middle of their A-Levels could have been a problem. In the interview with the female victim, we are going to try and make an effect using lights so that you cannot see her face, only her silhouette like this (leaving her to remain anonymous):

We actually thought of this before thinking of the amount of actors we would need but we then realised it had more than one advantage. It shows our camera skills but also means that we can use the same girl for the reconstruction and the interview. The name of the actress is Lydia Whittle. We knew we would be able to trust her as we used her last year in our media coursework and her GCSE and A-Level drama experience clearly shows in the filming. (Picture of Lydia below)

We couldn't find another girl who was free to film on the day we want to so I said I would act as the female friend as it it just a tripod shot. (Myself pictured below)

We had already decided we wanted to use Elliot Williamson for our attacker as he also acted in out media coursework last year and was very good. We decided that he should be used for the reconstruction and not the 'real footage' as the CCTV footage which we were going to shoot was only taken from ahead and as he was the best male actor we had we thought it would be best to use him to his full advantage. (Picture of Elliot below)

Matt Burge said that he would act out the CCTV footage as it is just going to be a walk around the carpark so although he is in our filming group, he wont be missing out on much as it is just going to be a tripod shot. (Picture of Matt below)

The final two people we needed to cast was the person who will intervene in the attack and talk about it in an interview, and the person who will intervene in the reconstruction. Because we have already planned our shots we know that the rescuers face wont be seen and also it will be dark so we will be using the same person for both. Anish Godwin Patel is the actor we chose. (Picture of Anish below)

Deciding on Casting
After properly deciding on our them of a Crime Documentary we realized that the topic we wanted to do it on was very personal so it was difficult to find somebody who wanted to share their story. So instead, we looked at various attempted rape stories and made our own, not in an attempt to miss-portray events but to raise awareness of what can happen to young girls.
These are the actors we are going to need:
These are the actors we are going to need:
- A female actress playing the victim in the interview
- A female actress for the reconstruction
- A female acress playing the friend in the interview
- A male actor to play the attacker in the CCTV footage
- A male actor to play the attacker in the reconstruction
- A male actor playing the rescuer in the reconstruction
- A male actor playing the rescuer in the interview
Subscribe to:
Posts (Atom)