The other day I saw a Louis Theroux documentary advertised on television which reminded me that I hadn't done any research into documentarists in a while. Unfortunately, as the advert i saw was on a program i had recorded i actually missed it but when 'googling' some documentarists i studied at the start of my course, i found out this...
In 1999 Nick Broomfield did a series of 5 television adverts for Volkswagen in his unusual style of documentation whilst holding the sound boom with him. They are designed to be amusing and light hearted and as if Broomfield is trying to find out imformation.
http://projector.tv/MediaPage.aspx?MediaID=84413 - Nick Broomfield visits a technology lab in Kyoto where one man is designing a new CD eject mechanism
http://projector.tv/MediaPage.aspx?MediaID=84412 - Nick Broomfield goes to a military testing site to check out their ejector seat technology
http://projector.tv/MediaPage.aspx?MediaID=84330 - This time, Nick Broomfield is on a mission to find out about the chemicals one can find in the dead sea
http://projector.tv/MediaPage.aspx?MediaID=84329 - Nick Broomfield tries to find out some alternative uses for the bulletproof glass used to protect the president of the Unites States
http://projector.tv/MediaPage.aspx?MediaID=84321 - Nick Broomfield has pursued VW engineers around the world in the search for some top-secret technological breakthroughs. This became the basis for the now famous VW ad campaign ‘German for Detail’.
Tuesday, 22 March 2011
Thursday, 17 March 2011
Idea for CCTV Footage editing
After thinking for ages about how we could make the ring around the attacker walking into the car park on the CCTV footage i decided to take a video of myself and have a play around with it on iMovie, trying to figure out a way to do it. I did find a way which took quite a long time but now that I know how to do it i will be able to hopefully improve it and then we will have the option of whether or not to use it in our final piece.
Firstly, i took a film on my computer using the built-in camera. I then imported this into iMovie and created a new project. After snipping off the start and end (there were unnecessary seconds either side) I found the part of the video where i wanted the ring to appear and right clicked to bring up a menu. I then selected 'Add Freeze Frame from this menu'.

I then turned the clip to black and white by double-clicking and selecting the 'Black and White' video effect.

I then used a program on my Mac called 'Grab' which is the equivalent of the printscreen button on a Windows PC and 'grabbed' the picture in the top right hand side of the iMovie screen.

I then saved this picture to my desktop and opened a program called Paintbrush which is very similar to Paint on a PC and went to File; Open. And opened the image which i had just 'grabbed'.

I then used the circle tool in Paintbrush to circle myself, the part of the picture i wanted to highlight.


I turned the whole clip into black and white using the same technique as the way i had done it before with the freeze frame. Lastly, I added a title at the start just to introduce it and put some music behind it so its not just silent to listen to (I cut the sound out of the clips by double clicking on the clip and setting audio to 0%)
Before exporting to QuickTime the finished result on iMovie looked like this:

Tuesday, 15 March 2011
Posting from your mobile

Sent from my BlackBerry® wireless device
Tuesday, 8 March 2011
Monday, 7 March 2011
Saturday, 5 March 2011
Editing the Second day of Filming
First of all, we edited the two interviews. On the camera, it looked as though you couldn't see any of Lydia's features in the shot which was what we wanted but when we put it onto the computer today it was actually very obvious and you could see her quite clearly. After playing about with the different settings we got the desired effect (below).

There wasn't any editing that needed to be done to the friends interview except we added the same title (Gradient - Black) and wrote 'Rachel - Victim's Friend'.

We started to edit the footage of the attack but quickly realised that it was far too dark and no amount of editing will make it easy to see. We also realized we hadn't got enough footage or in enough angles so we decided not to edit the footage because we are not going to use it. Instead we are just going to take our mistake and learn from it so that next time we film we can get the shots right. As you can see below there were some shots that were so black no amount of editing could fix it.

Tuesday, 1 March 2011
Second day of Filming
Today we had a few things which we had to film.
1. The victims interview
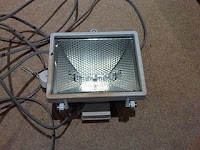
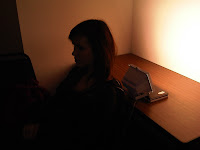 We found an empty office in the ground floor of the common room building which was perfect as there was just a chair and a desk against a white wall. Olivia found a spotlight at her house (I didnt get a photo so this was taken by Olivia) which originally we placed behind Lydia on the desk with the light facing towards the camera but because of the intensity of the light we found that the desired effect could actually be achieved just by having the light directed at the wall with the rest of the lights in the room turned off. We used a tripod to capture the shot. The shot gave the exact look that we wanted and you can only see Lydia's silhouette.
2. The friends interview
For the interview in which I played the friend of the victim, we used the same room but just the other side of it. The shot was taken on a tripod with me at the side of the shot.

3. The attack
We filmed Elliot attacking Lydia on the ground of the carpark in 2 different positions and a from a few different angles. We got a high angle shot of them and some other regular 2-shots. The lighting wasn't very good as it was already getting dark outside and as we were filming behind the skip it was blocking out what little light there was. I did shine a torch from my phone onto the scene as it was being filmed but it did little to help. Hopefully we will be able to fiddle with the effects somehow and make it slightly lighter so that the viewer can see what's going on. Below is a picture of what we filmed to show how dark it is.
Subscribe to:
Comments (Atom)